|
ModelRight can compare your Model with the database to show differences between the two. You can export differences from the Model to the database (via an ALTER script) to make the database like the Model, or you could import differences to make the Model more like the database. The Compare with Database wizard is used for both purposes: |
How to Compare your Model with the Database:
1.Select Database > Compare with Database from the menu, or select ![]() from the Database toolbar, or select
from the Database toolbar, or select ![]() from the Database Tasks section of the Shortcut Toolbar to start the Compare with Database wizard.
from the Database Tasks section of the Shortcut Toolbar to start the Compare with Database wizard.

2. Connect to the database that you want to compare with:

•Enter the connection information for the database that you want to compare with, and click on Next. ModelRight uses native drivers so there is no need to fuss with ODBC drivers.
3. In the next screen you define the database objects that you want to compare your Model with:

•Compare Filter and Name Filter - You can select which type of objects you want to compare by toggling the options in the Compare Filter tree. You can filter any type of object by Name by entering a comma separated list of filters in the Compare Filter tree control (you need to click twice, slowly in the Name Filter section). These filters are used to form a LIKE condition in the query that ModelRight uses to retrieve database objects. If a Name filter term starts with a "!", then a "NOT LIKE" condition will be used for that term. In the screenshot above, the Table Name filter specifies that only Tables starting with "EMP" or "JOB" will be compared. You can also expand any type of object in the Compare Filter tree control and un-select any type of child object or property that you do not want to compare.
•Filter By Schema - if you select this option, then only objects from the selected database Schemas will be imported to compare with.
•Filter By Tablespace - select this option if you want to compare Table and Materialized Views based on the Tablespace they are in.
•Include Referenced Objects: if this option is selected, then if an object that is being imported references an object that is not selected for import, that referenced object will also be imported. i.e. if a Table you are importing has a Column that is a foreign key from another table that is not being imported, then that parent Table will also be imported - or if you chose not to import Tablespaces, and this option is selected, then ModelRight will automatically import Tablespaces that are used by the Tables that are imported.
•Match Using Owner - after ModelRight loads Tables (Views, etc.) from the database, it needs to match up Tables in the Model with the Tables in the database. If this option is selected, then the Table owners must match as well as the Table names before ModelRight will match the Tables.
•Match Case Sensitive - if selected, then the case of the Names of objects must match before ModelRight will match the objects.
4. Once you have specified what database objects that you want to compare your Model with, ModelRight must retrieve information about those objects from the database. This page of the wizard is displayed just so you can monitor the progress of this process and Cancel at any time.

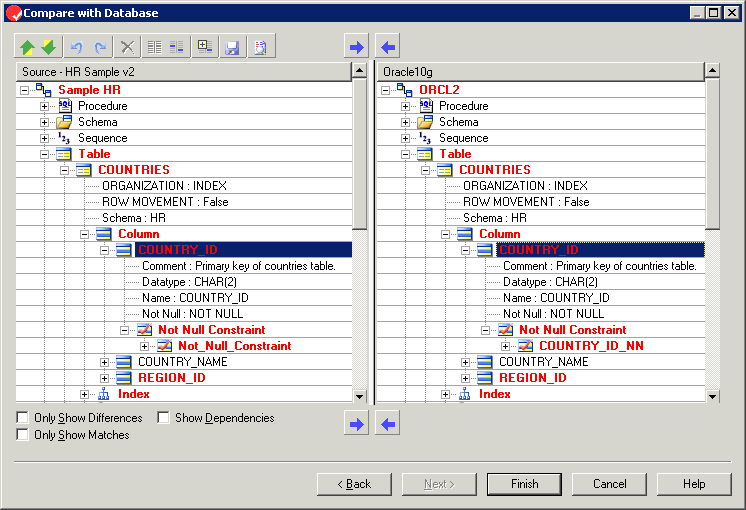
5. This wizard page shows the differences between your Model and the database objects that you have specified in the previous wizard pages.
Toolbar Buttons
![]() - export or import a difference. Use the import button
- export or import a difference. Use the import button ![]() to import a database object(s) or property into your Model. If you import an object/property from the database into your Model, the action is performed immediately and the comparison trees will be updated immediately with the result(s). Of course you can use the Undo/Redo toolbar buttons
to import a database object(s) or property into your Model. If you import an object/property from the database into your Model, the action is performed immediately and the comparison trees will be updated immediately with the result(s). Of course you can use the Undo/Redo toolbar buttons ![]() that are on the page to undo/redo any changes.
that are on the page to undo/redo any changes.
Use the export button ![]() to export to the database any object or property that is in your Model. If you export an object/property, the action is performed immediately on the database Model. However, the ALTER script that will actually change the database isn't produced until you go to the Next page.
to export to the database any object or property that is in your Model. If you export an object/property, the action is performed immediately on the database Model. However, the ALTER script that will actually change the database isn't produced until you go to the Next page.
![]() - go to the previous/next difference
- go to the previous/next difference
![]() - undo/redo changes that you made
- undo/redo changes that you made
![]() - delete an unmatched object on the Model or database side
- delete an unmatched object on the Model or database side
![]() - manually match or unmatch objects. If ModelRight doesn't automatically match two objects that should be matched (probably because their names are different), then you can do so manually. Simply select one of the objects, hit the match toolbar button
- manually match or unmatch objects. If ModelRight doesn't automatically match two objects that should be matched (probably because their names are different), then you can do so manually. Simply select one of the objects, hit the match toolbar button ![]() and select the other object that you want to match. You can also drag one of the unmatched items and drop it on the other one to match them. To unmatch two matched objects, select the matched items and hit the unmatch toolbar button
and select the other object that you want to match. You can also drag one of the unmatched items and drop it on the other one to match them. To unmatch two matched objects, select the matched items and hit the unmatch toolbar button ![]() .
.
![]() - expand all child tree items
- expand all child tree items
![]() - save current compare tree to file as XML data and then display. When this button is selected, a dialog will appear to let you optionally enter a command to process the XML.
- save current compare tree to file as XML data and then display. When this button is selected, a dialog will appear to let you optionally enter a command to process the XML.
![]() - show detailed differences of the currently selected items. Useful when the currently selected item is a multi-line property. When this button is selected, a dialog will appear to let you enter a shell command to run to show the differences between the selected items in detail. Enter the name of differencing application like WinDiff, Beyond Compare's application, etc...
- show detailed differences of the currently selected items. Useful when the currently selected item is a multi-line property. When this button is selected, a dialog will appear to let you enter a shell command to run to show the differences between the selected items in detail. Enter the name of differencing application like WinDiff, Beyond Compare's application, etc...
Only Show Differences - if selected, then items that match and are equal on the database and model sides are not displayed.
Show Dependencies - shows all the referenced objects that an object depends on. In some cases, importing/exporting an object's differences will not fully resolve the a difference unless its referenced objects are first imported/exported. Selecting this option will cause unresolved dependencies to be displayed under objects in the tree so that you have a visual cue to help you determine what needs to be imported/exported to resolve differences.
6. If you exported any changes in the previous step, then this page will be displayed next to let you specify Schema Gen options that might effect the ALTER script that will be produced in the next step.

Notice that the built-in Alter Script Schema Gen Options object has been automatically selected in the Option Set combo box.
7. This page displays the ALTER script that will implement the changes to the database that you previously specified.

ModelRight evaluates an object's Alter Script property to produce the ALTER script. You can view and change this script to customize how the ALTER is produced. See the Scripting section of this document. You can generate the ALTER script directly to the database, save it to file or copy/paste it to SQL/Plus to make the changes to your database.