Toolbar Docking
ModelRight 4.1 has improved window and toolbar handling.
When you drag the top of a toolbar (like the Explorers, Property Browser and Output Window), docking hints will be displayed to show you where the toolbar will be placed when the drag ends. You can specify subtle changes in the toolbar placement by dragging it over the docking hints.

Illustrates the docking hints that are displayed when a toolbar is dragged.
Also, you can dock any toolbar with any other toolbar. By default all of the Explorer toolbars are docked together, but you could separate them and dock them by themselves or with any other toolbar:

Illustrates a different docking configuration in which the Model, Domain, and Script Explorers are docked separately. And the Shortcut Taskbar and Script Explorer are Auto-Hidden.
Auto-Hide
The toolbars now have an Auto-Hide option to keep them from taking up screen space till they are needed. When they are not needed the are hidden on the side of the application and a tab is displayed instead. When you want to use the Toolbar, simply move the cursor over it and it will re-appear.
.

The Auto-Hide option is located in the upper-left corner of th toolbars.
Diagram Selection Dialog
A helper dialog is displayed when you hit Ctrl+Tab to help you select a Diagram or toolbar to display. You can either tab through the selections or click on the one you want.

Illustrates the Diagram selection dialog that appears when you hit Ctrl+Tab
Windows Styles and Skins
Style and Skins options have been added to the Windows Menu.
•Skins effect the overall look, feel, and color of the framing windows used by ModelRight 4.1.
•Styles fine-tune the fonts and look of the Skin and usually just change the window icons.
Play around with these options to find the combinations of Window Style and Skin that you like most.

Screenshot with Windows/Skin set to Office 2007/Blue and Windows/Style set to Office 2003

Screenshot with Skin set to XP Luna/Extra Large Homestead and Style set to Native XP
Create and Attach Shortcut
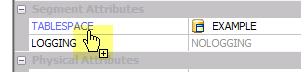
ModelRight has always allowed easy navigation to related objects via its unique hyperlinked User Interface. Now you can create, attach, and navigate all in one click. For example, if you are editing a Table and want to assign it to a new Tablespace, all you have to to is hold the Control key down and click on the Tablespace Hyperlink - as illustrated below. When you Ctrl+Click on a hyperlink in the Property Browser, ModelRight will create a new object of the type of the hyperlink, attach it to the currently selected object, and change the selection to the newly created object.
Property Grid
The Property Grid has options for displaying by Category or Alphabetically

The new property grid displaying categorized properties

The property grid the properties sorted alphabetically
Multiple Selection
ModelRight now supports the selection and editing of multiple Tables at the same time. This is useful when you want to change a property of the selected Tables all at once. The Table, Physical, SQL, Reset, and Graphics pages have been this enhanced with this capability.
Print Scaling
In ModelRight, you can simply drag the page boundaries that are displayed on the Diagram to change the print scale. i.e. how much is printed on a page. When the mouse rolls over a page boundary, the cursor changes as illustrated below. You can then select and drag the page boundaries. You can also set the scaling by entering a scale factor in a Diagram's Grid property page. Page Setting such as Landscape mode and Page sizing info are also saved.

Illustration of dragging the page boundaries. The highlighted lines show the dragged/new page boundaries. Notice the cursor change.